Monday, September 27, 2010

Spinach and Blueberry Smoothie


Spinach and Blueberry Smoothie

2 cups spinach (approximately 2 good handfuls)
2 cups blueberries
1/2 cup whey
1/2 cup kefir
1 Tablespoon honey

Blend together, if the mixture is too thick add a little more kefir or whey, not thick enough, add a banana.  Pour a tall glass and enjoy.


Thursday, September 23, 2010

Pressure Canning Tomato Soup


This past weekend we had a large amount of heirloom Persimmon and Beaver Lodge Plum tomatoes sitting on the table begging to be used before spoiling.  I decided it was time to can tomato soup.  On a cold winters day nothing is better than to come home to a warm bowl of soup.  Even better, after working all day and coming home to shoveling snow we will enjoy having quarts of tomato soup on the pantry shelves just waiting to be heated and served with a Jarlsberg grilled cheese sandwich and maybe even a glass of red wine to warm the heart.


Tomato Soup

1 medium onion, diced
1 stalk celery, diced
2 carrots, diced
4 cloves garlic, minced
1 quart whole tomatoes (or 28 oz. can, if store bought)
14 oz. chicken stock
2 teaspoons dried basil
1 teaspoon dried parsley
salt and pepper to taste

Saute' onion and celery in olive oil until translucent. Add garlic and saute' for another minute or two, watch close garlic burns quickly. Add tomatoes, crushing with spoon, then chicken stock and herbs. Salt and pepper to taste and simmer for 20 to 30 minutes. Finish soup by blending with a hand blender until partially smooth, leaving a few chunks of tomato.


This is the recipe I made up on the fly last winter and we loved the small chunks of tomato and the light garlic flavor.  The color is not bright red because the Persimmon tomatoes are yellow, there are carrots in the soup to add sweetness, and of course, the chicken stock.  This weekend I used my large stock pot and made five times this recipe.  Since I knew I wanted this soup ready to heat and serve and the recipe has several vegetables and chicken stock in it, I needed to use the pressure canner.


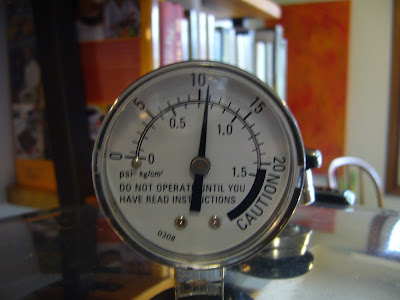
Pressure canning is no problem, in fact I prefer it because it takes less time and doesn't put as much steam into the air.  I pressure canned this soup for the same about of pressure and time as I did for the chicken soup and chicken stock I canned: 11 pounds pressure for 25 minutes.


Every time I pressure can I take a look at the instructions again, never taking for granted that I remember all the steps.  I have highlighted the ones I need to review and so it only takes a few seconds to look them over before starting.  The instruction booklet also has the pounds of pressure and time needed for each type of food.


When I first started pressure canning, I was hesitant, I had heard the horror stories my grandma told of her mother's cooker exploding.  Pressure canners have come a long way since then and I have found that it is not a process to be intimidated by at all, there are built in safety features.  Just follow the directions, keep an eye on the pressure, turning the heat up or down to keep it as constant as possible, and enjoy the shorter processing time.

Wednesday, September 22, 2010

Homemade Granola


Homemade Granola

2 c. rolled oats (not instant)
1 c. toasted almonds
1/4 c. sesame seeds
1/2 c. toasted sunflower seeds
1/4 c. toasted wheat germ (optional)
1/2 c. raisins
1/2 c. dried fruit
Scant 1/4 c. cooking oil (not olive)
1/2 c. honey
Mix oats, nuts and grains in a large bowl.  Measure oil into a measuring cup and swirl it around before pouring into a bowl.  Then measure out the honey in the same unwashed cup.  The oil will help the honey exit the cup.  Toss everything together until evenly coated and then pour out into a baking pan.  Use a large roasting pan as it keeps everything contained and can be stirred easily.  Bake at 300 for 30 minutes turning with a spatula every 10 minutes so everything is an even golden brown.  When it is finished cooking return the baked granola to the mixing bowl, add the raisins and dried fruit and stir to combine.  Stir gently several times as it cools, so that it doesn't clump too much.

Tuesday, September 21, 2010

Using the Whole Pumpkin


Nothing wasted, that's my motto.  When processing pumpkin, nothing needs to be wasted.  First choose a pie pumpkin, they are usually dark orange and small, the flesh will be sweeter and less watery.  Cut the pumpkin in half and scoop our the seeds and stringy bits.


But wait!  Don't throw out those seeds, they make a good snack.  The stringy bits can be put into the compost, so nothing is wasted there either.  Give the pumpkin seeds a quick wash and let them drain while the pumpkin bakes.


Next place the two halfs face down in a cake pan with about a half inch to an inch of water in it, cover with aluminum foil (reused as you can tell from the photo).  Place this in a 400 degree oven until the rind side is easily pierced with a fork.  When the flesh and rind are soft place on the counter to cool.  Once cool scrap the flesh off the rind and if not using in a recipe right away store in 2 cup measurements in a freezer container in the deep freeze and it will keep for months.  Most of my recipes call for 2 cups, so that is a convenient amount to have on hand.  Now the rind can go into the compost pile as well. 


Once the pumpkin is out of the oven the seeds can go in, I usually turn the oven down to 375 degrees so they don't start popping and make a mess in my oven.  I spray the pan with non-stick spray, place the seeds in the pan and sprinkle with salt.  Bake until they are a light golden brown and crunchy, mmm.  I eat the whole seed and spit out any part that seems too woody.  Pumpkin seeds are a natural source of most of the B vitamins, along with C, D, E, and K.  They also contain the minerals calcium, potassium, niacin, and phosphorous.

Then use the pumpkin flesh for any of the many wonderful pumpkin recipes, such as this wonderful Fruit and Nut Pumpkin Bread.  The fruit can be left out if you prefer, I have made it both ways.


Fruit and Nut Pumpkin Bread

2 cups sugar
2 cups pumpkin puree
1 cup vegetable oil
4 eggs
1 teaspoon vanilla extract
3 1/2 cups all-purpose flour
1 1/2 teaspoons ground cinnamon
1 teaspoon salt
1 teaspoon baking soda
1/4 teaspoon ground cloves
1 1/2 cups chopped walnuts
2/3 cup chopped dates
2/3 cup raisins
2/3 cup cranberries

Preheat oven to 350 degrees Fahrenheit.
Grease and flour two bread pans.
In a large bowl, beat the sugar, pumkin, oil, eggs and vanilla until well blended. In another bowl combine the flour, cinnamon, salt, baking soda and cloves. Gradually add to the pumpkin mixture blending well. Fold in the walnuts, dates, raisins and cranberries.
Transfer to prepared loaf pans and bake at 350 for 1 hour and 10 minutes or until a toothpick comes out of the center clean. Makes 2 loaves.


Thursday, September 16, 2010

Seasonal Homemaking


As I write this the air is crisp and cool, the sky clear blue, and there is a smell of dry leaves; the calendar says autumn is a few days away, but here in the northern reaches autumn has arrived.

I like the changing seasons.  Every season calls for a different homemaking skill.  Spring sees the garden planted, house thoroughly cleaned, and a return to line-dried laundry.  Summer gardening means lots of weeding and meals with fresh vegetables, canning and other methods of food preservation intensify as pantries are stocked for the winter.  I have several boxes of tomatoes yet to can and I hope to have several bushels of apples to make juice and applesauce to preserve.


In autumn the garden slows down or is complete and canning is finishing up, baking returns, and the focus changes to preparing the house for winter.  Winter gives us time to improve on our sewing, knitting and crocheting skills, baking warms the house and the pace of life slows a little. 

As a new season approaches I am usually ready for the change.  Each season is exciting and busy with its particular work that needs to be done.  Spring is intense with planting that needs to be done and the hope that the weather cooperates.  Late summer and early autumn are especially intense with preserving food.


Each fall we buy chickens from a friend who raises them, this year we had a few left yet from last year so I made chicken soup and chicken stock and canned several jars worth.  We now have homemade chicken soup for when one of us is feeling under the weather or just a quick meal on a busy day.  My recipe for chicken soup is located here.  I left out the noodles so that they wouldn't get mushy, I will add them when I heat the soup.


I enjoy cooking and baking and as fall turns to winter I look forward to having more time to spend experimenting with bread, new recipes, and improving my cooking skills. 

I am also trying to improve my sewing skills, I have always wanted to make a quilt and I now have one started.  It will take me a while, I have very little time after working all day to spend on craft skills, but I am slowly learning and that is ok, it is not about finishing a project quickly, I enjoy the process.  I am also slowly improving my knitting and crocheting, I have yarn and instructions ready to crochet socks and and an afghan started so now I look forward to spending some cold days with warm yarn.


Every season has it's pleasures and I want to take the time to enjoy all the seasons and continue to learn new skills that will benefit our household.  I have been reading Laura Ingalls Wilder's Little House on the Prairie books again, currently the book "The Long Winter".  These books are fiction, but based on fact, and I marvel at the homesteading and homemaking skills they had or needed to learn.  These homemaking and homesteading skills still come in handy, they save us money, provide a healthier lifestyle and make a house feel like a home.

Wednesday, September 15, 2010

Slow-Baked Tomato, Garlic and Basil


Slow-Baked Tomato, Garlic and Basil
adapted from a Better Homes and Gardens recipe
1 1/2 pounds cherry or grape tomatoes
1/4 to 1/2 cup extra virgin olive oil
7 cloves garlic, peeled and split lengthwise
1 bunch fresh basil, trimmed
1 to 2 teaspoons coarse or flake salt
1 teaspoon freshly ground black pepper
Toasted slices of ciabatta (or similar) bread
Fresh sliced parmesan cheese (optional)

Preheat oven to 325 degrees.  Wash and drain tomatoes well.  Pat dry with paper towels.  In a non-metal 2-quart baking dish place tomatoes in a single layer.  Pour olive oil over so that they are well coated and there is a thin layer of oil on bottom of dish.  Toss in garlic, basil, salt and pepper.

Bake uncovered, for 45 to 60 minutes or until skins split and soften but tomatoes still retain their shape.

Serve hot, warm or at room temperture.  Spoon or mash over slices of toasted bread and serve with a slice of parmesan cheese if using.

Makes 8 servings.


Wednesday, September 8, 2010

Chewy Chocolate Chip Cookies


Chocolate Chip-Oatmeal Cookies
Makes about 4 dozen cookies

1 3/4 cups unbleached all-purpose flour
1 teaspoon baking soda
1/2 teaspoon salt
1 cup (2 sticks) unsalted butter, at very warm room temperature
1 cup packed dark brown sugar
1/2 cup sugar
2 eggs, beaten
1 1/2 teaspoons pure vanilla extract
2 cups oatmeal (not the quick-cooking variety)
2 cups semisweet chocolate chips
1 cup chopped pecans, toasted (or walnuts, untoasted)

Preheat the oven to 350 degrees fahrenheit.

Sift together the flour, baking soda, and salt.  Cream the butter with both sugars in a large bow, using a sturdy spoon or stand mixer.  Mix in the eggs, one at a time, then the vanilla.  Stir in the sifted ingredients, about half at a time, mixing just until combined.  Stir in the oatmeal, chocolate chips, and nuts, again mixing just until combined.  Drop the dough onto ungreased cookie sheets by rounded tablespoons, leaving 1 1/2 to 2 inches between the cookies.

Bake for 10 to 12 minutes, until just lightly browned and set.  Do not overbake.  Cool the cookies on the baking sheet for 1 to 2 minutes, then remove them to baking racks.  Serve warm or at room temperture.


Tuesday, September 7, 2010

A Peck of Pickled Peppers


Pickled Hot Peppers
recipe from the Putting Food By cookbook

4 quarts peppers
4 cups vinegar
4 cups water
4 teaspoons salt
Olive Oil (optional), I leave this out

Wash peppers thoroughly.  Remove core, seeds, and stems of large peppers. (I leave them in the jalapenos, as you can see from the photos, we want the spice.)  Cut as desired, or leave whole after coring.  The small, hot peppers may be left whole with stems intact.  Make 2 small slits in whole peppers.

Mix vinegar and water; heat to 150 - 160 F. / 66 - 71 C. about to the simmering point.  Since it is rather volatile, vinegar should not boil a long time.  Pack peppers rather tightly into jars.  Pour hot vinegar and water over the peppers to 1/2 inch of jar rim.  If oil is desired, add vinegar to only 3/4 inch of jar top.  Add olive oil to come 1/2 inch from top.  The peppers will be coated with oil when they pass through the oil layer as you use them.  Add salt to taste, seal, and process 15 minutes in simmering (180 - 185 F./82 - 85 C.) hot water bath.


Thursday, September 2, 2010

Learning to Live a Simple Life


Over the weekend I was visiting with a woman who said she was 79 years old and had always lived a simple life.  She and her husband farm still, along with their son.  She has always had a garden and put up produce for winter use.  They relied on that garden to see them through the winter.  If it was a bad year for a particular vegetable they went without that year.  There was no running to the grocery store for whatever they desired at any given moment.  They planned ahead and made do with what they had.


She still gardens and preserves, we compared notes on how our gardens did this year and what produce we had put up.  There is so much to learn from those who have lived a simple life for many years; they know how to do it.  It is a way of life for them, not the latest trend, so they have settled into the routine and are comfortable with their life.


She agreed that this had been a good year for cherry tomatoes and told me she freezes them whole.  I too have frozen cherry tomatoes whole and used them in pastas.  However, she said she likes to use them in soups, the skins float to the top and can be picked out; a terrific idea.

Cabbage is a vegetable she grows or gets from her neighbor.  To be able to make cabbage rolls in the winter, she said she blanches the cabbage leaves, cuts out the tough rib, rolls the leaves and places them in freezer bags.  When she is ready to make her cabbage rolls, she thaws the leaves thoroughly, unrolls and stuffs them.  Another idea I will be putting into practice.  My cabbages have been used for making sauerkraut and one dish of cabbage rolls, however, the farmer's market will have cabbages that I can blanch and freeze, and we will still be eating from a local food source.


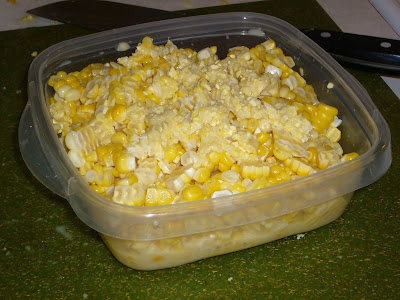
When I was young and living at home my mother taught me how to cream the corn as it was taken off the cob to be frozen for eating later.  This is a simple process and tastes so amazing, even in the middle of winter, with the corn off the cob, it has the fresh taste of just picked corn.  We don't have a lot of freezer space so leaving all the corn on the cob is not an option, but we don't mind.  We prefer our corn on the cob grilled rather than boiled anyway, so in the winter this creamed corn is the way to go.  Now this is not creamed corn like you buy in a can, not at all.  In fact when I went to school I could not figure out why all the kids hated creamed corn, until I tasted canned cream corn for the first time, it was disgusting and nothing like what I called creamed corn.


Start by blanching the corn in boiling water for one minute, then plunging it into ice cold water to stop the cooking process, then you are ready to cut it off the cob, creaming it as you do so.  To cream the corn while taking it off the cob simply set your knife slightly away from the cob, cutting about half to two-thirds of the corn kernal off the cob.  Then go back to the cob and run your knife up the cob, scraping the bits of corn and milky juices off.  This works very well if the corn is not overripe, there will be lots of milky juice.


Store the corn in freezer containers or bags in the serving size you need for your family; it will be frozen as one mass.  Then when ready to cook just place the frozen or thawed corn in a pan and slowly heat, rarely do I need to add water, there is usually enough milky, sweet, juices.  You will begin to crave corn like this, it is so good.

Living simply used to be the way most everyone lived.  Life has become fast paced and fast food.  Expecting to have what we want, when we want it.  We have forgotten how to live simply and how good a way of life it can be.  There are those among us who still live a simple life, we need to take the time to learn from their wealth of experience.