Monday, June 25, 2012

The Kitchen Garden

Sense of Home Kitchen

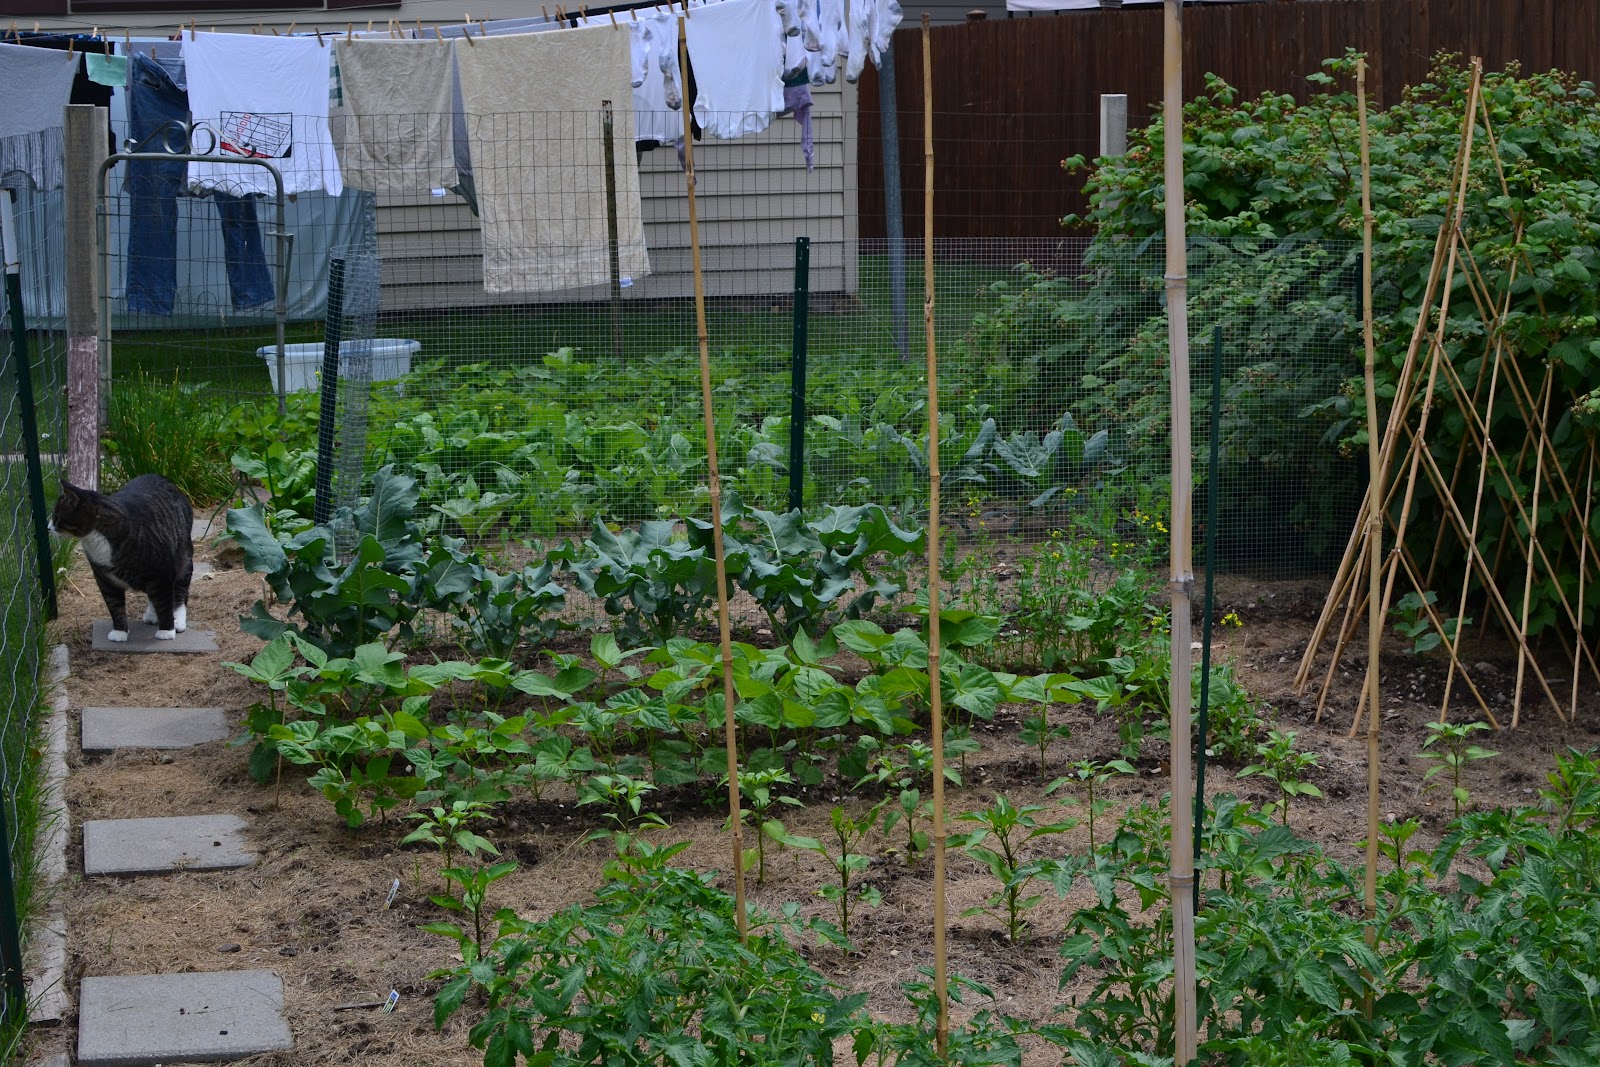
Welcome to my kitchen garden, it is growing rapidly and so far has produced for our dinner table strawberries, radishes, spinach, heirloom lettuces, broccoli rabe and herbs.  Soon there will be more than we will be able to eat and I will be canning, freezing, dehydrating, and pickling.  I love putting food up for the winter months, stocking the pantry with all kinds of garden goodness.


We have a few new plants in our garden this year, celery, brussel sprouts, and broccoli rabe, which has been chewed on by some bug and has already begun to go to seed, so we will only get a few salads from this plant.  It is interesting how there are good and bad years for crops, this year the spinach, lettuce and broccoli rabe are bolting early, that usually does not happen around here until mid-July.  On the other hand, the raspberries, broccoli, and brussel sprouts are having a very good year, and the tomatoes and peppers are bearing fruit earlier than normal.


I have a small garden, but I want to grow an abundance and variety of plants so I have to do some vertical gardening. I have a wire mesh fence for the peas and a trellis for the cucumbers to climb up, it is surprising how much produce a small garden can provide.


Beyond the fence for garden peas and the cucumber trellis are broccoli, beans, banana peppers, jalapeno peppers, tomatoes, zucchini, and raspberries bushes along the side.


From both directions. 


I have often resisted the urge to plant zucchini, there are so many people looking to give it away.  However, when you get free zucchini it usually comes in 1 to 2 foot sizes, which I have been grateful for and have used it to make bread and cake, and it is good sliced and grilled.  But, we also like zucchini when it is very small, sliced and stir-fried, roasted, and added to salads.


I have my tomatoes all staked up to their bamboo poles.  I use old nylons, tights, and socks to tie them to the poles; a gentle way to hold up the heavy fruit.  This is our second garden, it is about double the size you see here and is planted with eggplant, several herbs, peppers, and onions, besides the tomatoes.                                                                                        


Sweet Hot Peppers


The eggplant have flowered and now have tiny fruits growing.


The grape vine is taking over the shed and loaded with grapes, which, of course, the birds have already discovered and, not being able to taste the difference between sweet and sour they are helping themselves to the still green fruit.


There will be a good crop of raspberries this year and the few that have ripened are very sweet and juicy.  I will be freezing several quarts of raspberries for winter use.  The berries below have another week or so to go before they are red and ready to eat, but when they are I plan to enjoy a bowl of raspberries and cream while sitting on the patio.


Monday, June 11, 2012

White Mushroom Lasagna with Red Pepper Tomato Sauce

Sense of Home Kitchen

White Mushroom Lasagna with Red Pepper Tomato Sauce
~Sense of Home Kitchen, adapted from Gourmet, February 1994~

Serves 6 to 8

For red pepper tomato sauce:
2 tablespoons olive oil, divided
1 tablespoon butter
1 pound white mushrooms, sliced
1 large Vidalia sweet onion, finely chopped
3 large garlic cloves, minced
3/4 teaspoon dried rosemary, crumbled
a pinch dried hot pepper flakes
4 sweet red bell peppers, sliced thin
2 cups whole tomatoes
2 tablespoons balsamic vinegar, or to taste

For white mushroom mixture:
2 cups fresh sliced white mushrooms
1/2 stick (1/4 cup) unsalted butter
1/4 cup all-purpose flour
2 cups milk
1 cup half and half
freshly grated nutmeg to taste
1/2 teaspoon white pepper

1 pound lasagna noodles
2 cups grated mozzarella cheese ( about 8 ounces)
2 cups freshly grated Parmesan cheese (about 6 ounces)

To make red pepper tomato sauce:
In a heavy skillet measuring at least 12 inches across the top saute mushrooms in 1 tablespoon olive oil and 1 tablespoon butter along with salt and pepper to taste.  Add the remaining tablespoon of olive oil to the skillet and cook onion with garlic, rosemary, red pepper flakes, and salt and pepper to taste until softened.  Stir in bell peppers and tomatoes and cook, covered, over moderately low heat, stirring occasionally, until peppers are very soft, about 20 minutes.  In a blender or food processor purée tomato pepper mixture in batches, transferring to a large saucepan as puréed, and stir in vinegar.  Add mushrooms to sauce and simmer, uncovered, 5 minutes.

Preheat oven to 375° F. and oil a 13- by 9-inch baking dish.

To make white mushroom mixture:
Chop white mushrooms fine.  In a heavy saucepan melt butter over moderately low heat.  Add flour and cook roux, whisking, 3 minutes.  Add milk and whisk while bringing to a boil.  Stir in mushrooms, nutmeg, white pepper and salt to taste and simmer over low heat, whisking occasionally, until thickened, about 5 minutes.

Boil lasagna according to package directions, drain and rinse in cool water, set aside.  In a small bowl toss together mozzarella and Parmesan.  Spread enough red pepper tomato sauce in prepared dish to coat bottom.  Over sauce in dish layer in this order: lasagna noodles, 1/3 mushroom mixture, 1/3 cheese, and 1/3 remaining red pepper tomato sauce.  Repeat twice, reversing order of red pepper tomato sauce and cheese at end of last round of layering so that cheese is on top.

Bake lasagna in middle of oven 35 to 40 minutes, or until golden, and let stand 10 minutes before serving.


Sense of Home Kitchen / Recipes / Pasta

Wednesday, June 6, 2012

Canning: Red Onions in Vinegar

Sense of Home Kitchen

Red Onions in Vinegar
~Sense of Home Kitchen, based on a recipe from the Ball Complete Book of Home Preserving~

Makes 4 pints

4 cups red wine vinegar
1 clove garlic
10 cups peeled and sliced red onions (about 1/4-inch thick)

Prepare water-bath canner, jars, rings, and lids by washing in hot soapy water.  Fill canner 2/3 full of water and place jars in, making sure they are 2/3-filled with water and sitting on a rack, not the bottom of the pot.  Cover canner. Heat water to a simmer over medium-high heat to sterilize the jars, boiling is not necessary.  Leave jars in hot water until ready to fill with onions.

Meanwhile, in a large stainless steel saucepan, combine vinegar and garlic.  Bring to a boil over medium-high heat and boil gently for 5 minutes until garlic flavor has infused the liquid.  Add onion rings, increase heat to medium-high and bring to a boil.  Reduce heat and boil gently, covered, for 5 minutes, until onions are heated through.  Discard garlic.

Place new, washed, jar lids in a small saucepan of water and bring to a simmer over medium-high heat, simmer for 30 to 60 seconds, do not boil.  Pack hot onion rings into hot jars to within a generous 1/2-inch of top of jar.  Ladle hot vinegar liquid into jar to cover onions, leaving 1/2-inch headspace.  Remove air bubbles with a non-metalic utensil and adjust headspace, if necessary, by adding hot vinegar liquid.  Wipe rim with a clean cloth.  Center sterilized lid on jar. Screw band down until resistance is met, then increase to fingertip-tight.

Place jars in canner, ensuring they are completely covered with water.  Bring to a boil and process for 10 minutes. Remove canner lid and wait 5 minutes, then remove jars, cool, remove band and test to see that they are sealed, wipe down jar and store.


Sense of Home Kitchen / Recipes / Canning

Sunday, June 3, 2012

Blueberry-Apricot Quinoa Muffins

Sense of Home Kitchen

Blueberry-Apricot Quinoa Muffins
~Sense of Home Kitchen, inspired by, but adapted considerably from Chef In You~

Makes about 15 muffins

1/4 cup heirloom red quinoa, (or whatever quinoa you have available)
1/2 cup water
1 1/2 cups whole wheat flour
1/2 teaspoon baking soda
1/2 teaspoon baking powder
1/2 teaspoon salt
1 teaspoon cinnamon
3/4 cup packed brown sugar
1/4 cup coconut oil
2 eggs
1/2 cup sour cream
1 teaspoon vanilla extract
1 cup canned apricots, preferably home canned (another soft or cooked fruit could be used if you don't have apricots available)
1 cup fresh blueberries

Preheat oven to 375° and line or butter and flour muffin tins.

Bring quinoa and water to a boil in a medium-sized saucepan.  Cover and reduce to a simmer and cook for 10 minutes.  Turn off the heat and leave the covered saucepan on the burner for another 15 minutes.  When done the grain will be soft and the red will become translucent and the germ ring will be visible along the outside edge of the grain, as seen in one of the photos above.  Fluff with a fork and allow the quinoa to cool.

In a medium-sized bowl combine the flour, baking soda, baking powder, salt and cinnamon.  Add the cooked and cooled quinoa to the flour mixture and mix throughly.

In a large bowl or mixer, cream the sugar and coconut oil.  Thoroughly mix in the eggs, sour cream, vanilla, and apricots.  Gradually add the flour and quinoa mixture stirring until just combined.  Gently fold in the blueberries.

Spoon batter into prepared muffin tins and place in preheated oven.  Bake for 25 to 30 minutes or until a toothpick inserted in the center of a muffin comes out clean.

Cool on a rack and enjoy.


Sense of Home Kitchen / Recipes / Muffins