Wednesday, May 30, 2012

A Day Spent Canning

Sense of Home Kitchen

A day spent canning resulted in 4 pints red onions in vinegar, 4 quarts rhubarb juice, 4 quarts asparagus soup, and 9 quarts stock (chicken and beef).  The pantry is beginning to fill up again.


A friend went foraging for asparagus and shared her bounty, she knew I was hoping to get enough asparagus to can soup, I am very grateful for her generosity.  Wild asparagus does not always grow in neat evenly shaped stems, but the flavor is so much better that there just about isn't any comparison.  I love to eat those short little pieces that grow out the sides of the stem, I eat them raw and they taste like fresh garden peas, they are also good grilled.


I pressure canned both the asparagus soup and the stocks.  The soup had stock in it so I canned both at 11 pounds of pressure, not as scary as it sounds.  It is actually quite easy and with the new pressure canners it is safe.  See the pressure gauge above, it is at 11 pounds pressure, see the black line, that is the CAUTION zone, about 10 pounds of pressure more than the 11 required for stock.  Just watch the gauge and when it creeps up to 12, turn the heat down slightly, it will gradually come back down, gradual is best since you don't want the pressure to drop too low either.  I would turn the heat way down or even off if the gauge was approaching the caution area, I have never had to do that because I keep a close eye on the gauge, cleaning the kitchen and doing dishes, but not leaving the room.


I then made and canned rhubarb juice using the juicer you see here.  These jars are sitting on the counting waiting for that satisfying pop sound.  All the jars successfully sealed.


I got a bargain on a large bag of red onions so I sliced, combined with red wine vinegar, and canned.  I will post the recipe and process when I have time.


Because of the vinegar I was able to water-bath can the red onions.  I borrowed the jar rack from my pressure canner, the rack I have for my water-bath canner does not work well with pints and placing the jars directly on the bottom of the pot can cause jars to crack, or having them tip and fall through the rack that does not work well could result in jars cracking or not sealing properly.


The finished product, aren't they pretty?!  These onions will be good on salads and buying while the price is low saves money and provides a quality product, ready to use, on the shelves of my pantry.


Monday, May 28, 2012

Roasted Golden Beets, Fennel, and Zucchini

Sense of Home Kitchen

Roasted Golden Beets, Fennel, and Zucchini
~Sense of Home Kitchen~

Serves 4

3 golden beets
1 fennel bulb
2 small zucchini
Olive oil to drizzle
Hawaiian Black Salt, to taste
1 tablespoon fennel fronds

Preheat oven to 400°

Slice beets and fennel to approximately 1/4-inch thickness.  Slice zucchini lengthwise and then chop thickly, 1- to 1 1/2-inch.  Place on stainless steel baking sheet with as much of the vegetables touching the pan as possible.  Drizzle with olive oil, sprinkle with salt and fennel fronds and place in oven.

Roast for 20 to 30 minutes, until vegetables caramelize on edges and beets are tender.  Serve immediately.


Sense of Home Kitchen / Recipes / Vegetables  

Saturday, May 12, 2012

Strawberry-Rhubarb Bars

Sense of Home Kitchen

Strawberry Rhubarb Bars
~Sense of Home Kitchen, adapted from a rhubarb bar recipe printed in the Star Tribune in 2009~

Serves 12 to 15

2 cups chopped fresh rhubarb (1/2-inch pieces)
1 generous cup quartered large strawberries (halved, if small)
1 tablespoon fresh lemon juice
2 tablespoons water
3/4 cup granulated sugar
1 cup brown sugar, packed
1 1/2 cup all-purpose flour
1 1/2 cup regular oatmeal, uncooked
1/2 teaspoon salt
1 teaspoon cinnamon
1 cup unsalted butter, softened
1/2 cup chopped walnuts

Preheat oven to 350° F.  Lightly butter a 9- x 13-inch baking dish.

In a medium-sized saucepan, heat the rhubarb, strawberries, lemon juice, water and sugar on medium-high bringing it to a boil.  Reduce the heat and simmer until the rhubarb is tender and the mixture thickens to the consistency of thin jam, about 10 minutes.

In a medium-sized bowl mix together the brown sugar, flour, oatmeal, salt and cinnamon.  Then work in the softened butter with your fingers to make a crumbly dough.  Mix in walnuts.  Pat half of the dough into the prepared pan.

Spread the strawberry and rhubarb mixture onto the crust, then top with the remaining crumbles.  Bake about 30 to 35 minutes until golden brown.  Cool to room temperature.

Serve plain or with a scoop of vanilla ice cream.


Sense of Home Kitchen / Recipes / Cookies and Bars

Tuesday, May 8, 2012

Canning Rhubarb Sauce


I am home this morning, I have an appointment later on but thought I might start the day by working in our expanding garden.  Unfortunately rain has delayed those plans.  We have decided to expand our garden again this year, we are relying more and more on the food we grow ourselves and preserve so we are in need of more space.  Currently we have one garden in the back yard that is approximately 300 square feet and another backyard garden that is approximately 100 square feet, we are adding another 50 square feet to that garden.  This will bring our total backyard garden space to 450 square feet, not a large garden by any means, but we produce a lot of fruits and vegetables in this space.  Slowly our backyard is turning from grass to garden, trees and bushes.


We are able to produce strawberries, cherries, rhubarb, lots of raspberries, a few grapes, a few blueberries, lots of tomatoes, potatoes, squash, carrots, lettuce, spinach, beans, cucumbers, peas, peppers, eggplant, and a variety of other vegetables that I have forgotten at the moment.  I freeze, dehydrate, water-bath can and pressure can the foods we produce and we eat on these all winter.  Our pantry is looking sadly empty right now so I have been anxious to begin filling it again.  Rhubarb is ready to be picked and I have already been baking with it and there are more rhubarb recipes to come.  I have found though that for desserts fresh rhubarb is best, it becomes tough after it has been frozen, and so I do not plan to freeze as much this summer, just a few pints for breads, scones, and muffins. Rhubarb juice is fantastic, but making it requires a lot of rhubarb stalks and a lot of sugar for a quart or two of juice, so I will only make this if we end up with way more rhubarb than we can use.


Instead I have decided to can rhubarb sauce.  Rhubarb sauce is like applesauce, only with rhubarb.  More sugar needs to be used, but the taste is a wonderful sweet-tart flavor that has no match and being able to indulge in this sauce at the end of a cold, snowy day in mid-winter is a real treat.  I added cinnamon to this batch, I like to add cinnamon whenever I am able to, for the health benefits; the color is not as bright red, more of brownish red due to the cinnamon.  Please remember:  Never eat rhubarb LEAVES.  They are high in oxalic acid, which is poisonous.


Canning Rhubarb Sauce
~Sense of Kitchen, based on the instructions from Putting Food By~

To prevent pitting any of your sauce pots, it is best to use an enameled pot, such as this, when cooking rhubarb because it is an acidic vegetable.  The water-bath method of canning works for this sauce because of the level of acid in rhubarb.

Rhubarb stalks, fresh picked, leaves discarded
Sugar, 1/2 cup for each 4 cups of raw rhubarb
Cinnamon, to taste (optional)

Making the Sauce
Wash rhubarb stalks and trim ends, there is no need to peel the rhubarb if the stalks are young.  Cut the stalks into 1/2-inch pieces.  Measure.  Put rhubarb into an enameled pot, mix in 1/2 cup of sugar for every 4 cups of cut, raw rhubarb.  Let stand, covered, at room temperature for about 4 hours to draw out the juice.

While waiting for the rhubarb juice to be drawn out begin preparing your canning equipment as indicated below.

Add cinnamon to the rhubarb and sugar at this time if you wish.  Bring the pot of rhubarb slowly to a boil and boil for only 1 minute if you want the pieces left whole.  If you want the rhubarb pieces to break up and blend into more of a sauce as you see above, let the rhubarb cook for approximately 10 minutes, stirring occasionally.

Canning the Sauce
Fill the water-bath canner 2/3-full of water and place it on the stove over high heat to begin heating the water.

Wash and sterilize, in boiling water, pint jars and rings.  Fill sterilized jars with hot rhubarb sauce, using a wide-mouth funnel if you wish, leaving 1/2-inch of headroom, wipe rim with a clean cloth.  Place new lids in simmering water for 30 seconds, then place the lid on the jar and seal it with the ring.  Using a jar lifter, place the jars on the rack, in the canner and lower into the hot water.  If needed, add hot water to cover jars by 1-inch.  Bring the water to a rolling boil and begin timing.  Process either pints or quarts for 15 minutes.  Remove jars with jar lifter and place on a towel to cool.  Allow the jars to sit still for 24 hours.  Then check to see that the lid sealed, remove the ring, and wipe down the jar with a wet cloth to remove any sticky areas.  Place sealed jars in pantry and any that did not seal place them in the refrigerator to be eaten within the next week.

Serve the Sauce
The sauce is good cold, room temperature, or warmed.  Add a swirl of  cream for an extra treat.


Sense of Home Kitchen / Recipes / Canning 

Monday, May 7, 2012

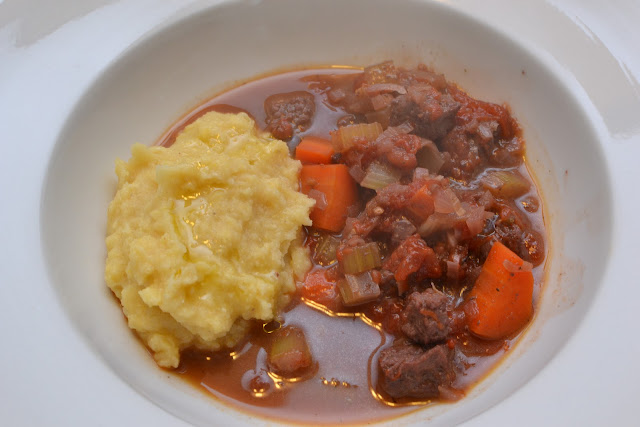
Tuscan Beef Stew with Polenta


Tuscan Beef Stew with Polenta
~Sense of Home Kitchen, adapted from Epicurious~

Makes 4 to 6 servings

Stew
3 tablespoons olive oil
1 small onion, cut into medium dice
1 leek, white and light green part only, finely diced
3 garlic cloves, minced
3 carrots, peeled and cut into 1/2-inch pieces
3 stalks celery, cut into 1/2-inch pieces
2 pounds stew beef, such as boneless chuck, trimmed of excess fat and cut into 1-inch cubes
2 1/2 cups dry red wine
1 teaspoon dried thyme leaves
1 quart whole tomatoes, drained (save juice for another purpose, another day)
3/4 teaspoon salt
1/2 teaspoon freshly ground black pepper

Polenta
1 tablespoon olive oil
4 cups chicken stock
1 cup polenta (coarse cornmeal)

Stew
In a heavy, large saucepan over moderately high heat, heat oil, then add onion, leek, garlic, carrot, and celery, sauté, stirring occasionally, until onions are soft and light golden brown in color, about 10 minutes.  Add beef and sauté, stirring occasionally, until brown on all sides, about 5 minutes.  Add wine and thyme, stir well, and bring to a boil. Add tomatoes, salt and pepper, then lower the heat to moderately low, cover and simmer, stirring occasionally, until beef is tender, about 2 hours.

Fifteen minutes before stew is finished, make polenta
Pour olive oil into a large serving bowl and swirl to coat.  Set aside.

In a heavy, large pot over moderately high heat, bring stock to boil.  Lower heat to moderate and slowly add polenta, stirring constantly, until polenta thickens and pulls away from sides of pan, about 10 minutes.  Transfer to the oil-coated serving bowl and keep warm until ready to eat.

Serve
When beef is tender, transfer stew to a large serving bowl.  Serve polenta alongside.


Sense of Home Kitchen / Recipes / Stews

Thursday, May 3, 2012

Chicken Braised with Lemon Slices and Moscato

Sense of Home Kitchen

Braised Chicken with Lemon Slices and Moscato
~Sense of Home Kitchen~

This recipe was inspired by a recipe I found in The Zuni Cafe Cookbook, by Judy Rodgers.  I would love to eat at her Cafe some day, I have learned so much from reading her cookbook and it is my hope that she is busy working on a second book.

The contrast of sweet Moscato wine with lemons in this recipe is fantastic and your house will smell wonderful. Braising is done at a lower temperature than roasting, and for a longer cooking time, allowing the flavors to develop.

Start with a very good chicken, preferably locally raised.  The chickens we helped butcher have been some of the most flavorful chicken we have ever had, we attribute this to the natural way they were raised.

Serves 4 to 6

1 whole chicken (3 to 4 pounds)
2 1/2 teaspoons salt, more to taste
2 tablespoons olive oil
1 medium white onion (ends trimmed, peeled and cut into wedges)
3 shallots (peeled and cut in half)
1 1/2 cups Moscato
2 tablespoons dry Sherry
1/2 cup chicken stock
1 bay leaf
1 teaspoon dried lemon thyme
1 teaspoon black peppercorns, cracked slightly in a mortar
15 to 20 dehydrated lemon slices

Sprinkle the whole chicken with 2 1/2 teaspoons salt and let rest in the refrigerator for at least 2 hours and up to 24 hours.  This seasoning hours before braising brings out the full rich flavor of the chicken and is based on the cooking methods of Judy Rodgers from the famous Zuni Cafe.

Place dried lemon slices in a bowl and pour moscato over the top, let soak for at least 30 minutes to plump up the lemons and infuse the wine.  Reserve both.

Preheat oven to 375°.

Pat the chicken dry to prevent sticking to the pan.  Heat two tablespoons olive oil in a 12-inch skillet over medium heat, add chicken and cook until the skin is evenly golden, turning chicken and adjusting the heat as needed.

Place chicken in an oven-proof baking dish and tie the legs with kitchen string to keep them together.  Place onion and shallot wedges around the bird.  Drain lemon slices, reserving both the moscato and lemons.  Add the lemon infused moscato, sherry and chicken stock to the baking dish making sure the liquid only comes to a depth of approximately 1-inch.  Add bay leaf to the dish and sprinkle chicken with thyme and cracked peppercorns.  Place moscato soaked lemons on, in and around the bird.

Although the braising pan is normally covered tightly, leave the chicken uncovered and place in preheated oven, basting three or four times throughout the cooking process, pouring juices over the charred lemons to infuse the broth and chicken with the wonderful flavor.  Braise for approximately 1 1/2 hours or until meat is tender and juices run clear between the leg and thigh or the thigh temperature is 165° when tested with a meat thermometer.

Remove from the oven and let rest while you pour the juices from the baking dish into a saucepan.  Skim as much fat off the top as you can remove and place the saucepan over medium-high heat and boil until the sauce reduces and thickens, making a fabulously rich tasting sauce.

Serve chicken with sauce on the side.


Sense of Home Kitchen / Recipes / Poultry